DevOps Simplified: Easy-to-Use Container Projects Deployment
As a developer, we’re constantly facing challenges in managing and deploying our projects or applications. Navigating the complexities of making application live on the internet can often seem daunting. In this article, we will explore an easy, streamlined flow for our application deployment, making the process not just manageable, but intuitive and efficient.
Here, we assume you’re already familiar with Docker basics and will focus on tools like Docker Compose, Portainer, and Nginx. Ready to streamline our projects from development to live environments? Let’s dive in.
The Main Tools
There are several tools to help managing our projects.
Portainer
Portainer is a lightweight management tool that simplifies the way we manage our Docker containers, Docker Swarm, and Kubernetes environments. It provides a user-friendly web interface that allows us to easily manage our Docker host or Swarm cluster. We’re using Portainer here to manage our containers stacks.
Nginx Proxy Manager
Nginx Proxy Manager is a tools that provide an easy way to manage an Nginx instance as a proxy host to our Application from the live internet. This tools also provide a free SSL using Let’s Encrypt if we do not own a custom SSL. This Nginx Proxy Manager will act as our application gateway to the public internet.
Step By Step
1. Setup Git Repo
This git repo will be the manifest for all of our application. We can manage all docker compose file of our application here. We can upload it to private GitHub repo to have all automation versioning bump with Renovate Bot
A manifest repo file tree is
.
├── renovate.json
├── app 1
│   └── docker-compose.yml
└── app 2
    └── docker-compose.yml
with the renovate.json
{
  "$schema": "https://docs.renovatebot.com/renovate-schema.json",
  "extends": ["config:recomended", "docker:enableMajor", ":dependencyDashboard"],
  "prConcurrentLimit": 0,
  "prHourlyLimit": 0,
  "docker-compose": {
    "fileMatch": ["(^|/)(?:docker-)?compose[^/]*\\.ya?ml$"]
  }
}
Follow Renovate docs for advanced configs e.g: private image registry (gcr, ghcr, etc)
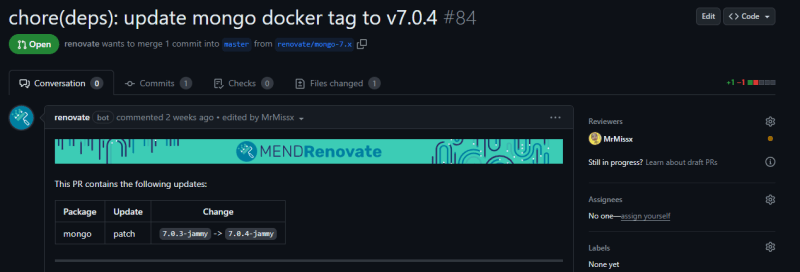
With this manifest repository, we will receive a PR from renovate every update on the docker image tag.
2. Create a Docker Networks
Docker network is a feature of docker to define and manage network to connect a container. We have to connect all of our container in one network so that it will be able to communicate to each other.
docker network create my_network3. Spin Up Portainer Instance
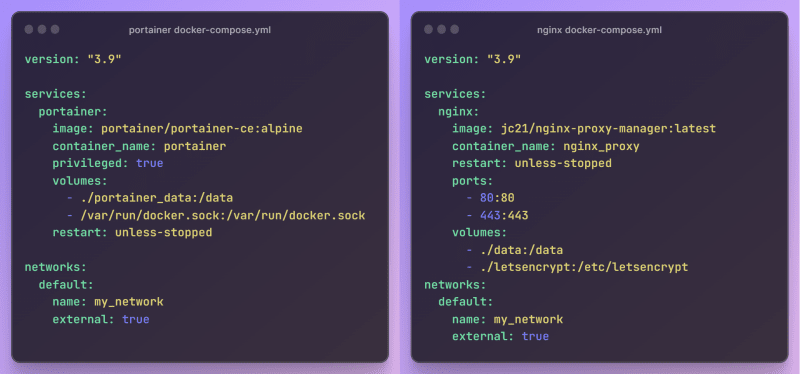
To spin up a Portainer instance is simple, all we need is a single docker-compose.yml file.
version: "3.9"

services:
  portainer:
    image: portainer/portainer-ce:alpine
    container_name: portainer
    privileged: true
    volumes:
      - ./portainer_data:/data
      - /var/run/docker.sock:/var/run/docker.sock
    restart: unless-stopped
    ports:
      - 9443:9443
networks:
  default:
    name: my_network
    external: true
Now that the installation is complete, we can log into Portainer dashboard on:
https://localhost:9443We might have to replace the localhost with the server IP’s.
4. Boots up Nginx Proxy Manager
Now we need to run the Nginx Proxy Manager for our reverse proxy. all we need also a single docker-compose.yml file.
version: "3.9"

services:
  nginx:
    image: jc21/nginx-proxy-manager:latest
    container_name: nginx_proxy
    restart: unless-stopped
    ports:
      - 80:80
      - 81:81
      - 443:443
    volumes:
      - ./data:/data
      - ./letsencrypt:/etc/letsencrypt
networks:
  default:
    name: my_network
    external: true
Follow the docs for more advanced instruction
There are 3 core ports exposed here. 80 and 443 is the gateway for public HTTP and HTTPS ports. 81 is used for the Nginx Proxy Manager dashboard.
We’ll need to log into the nginx dashboard via
http://localhost:81Again, we might have to replace the localhost with the server IP’s. It generate a default user [email protected] and password changeme. You will be asked to modify this at first.
5. DNS Setup
After running Portainer and Nginx Proxy Manager, we need to setup our DNS to point to our server. I’m using cloudflare here for the example.

Setup both desired Nginx and Portainer domain/subdomain.
6. Nginx & Portainer domain setup
On the nginx proxy earlier, go to Proxy Host and add a new one
Nginx Host
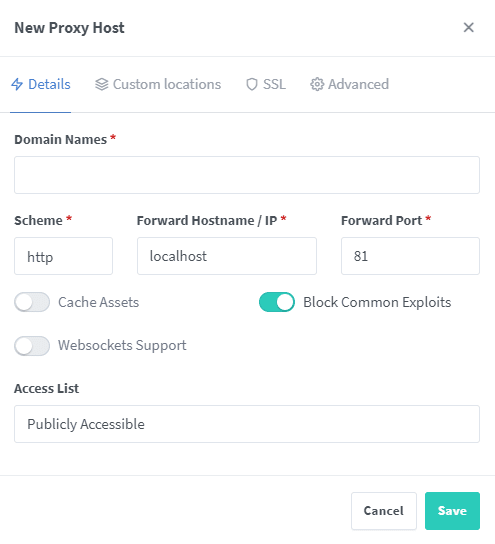
Insert our domain name we setup earlier on Cloudflare and forward it to localhost with the port 81 as the dashboard we currently in are on port 81. Here we can also tell Nginx Proxy Manager to generate a new SSL.
Portainer Host
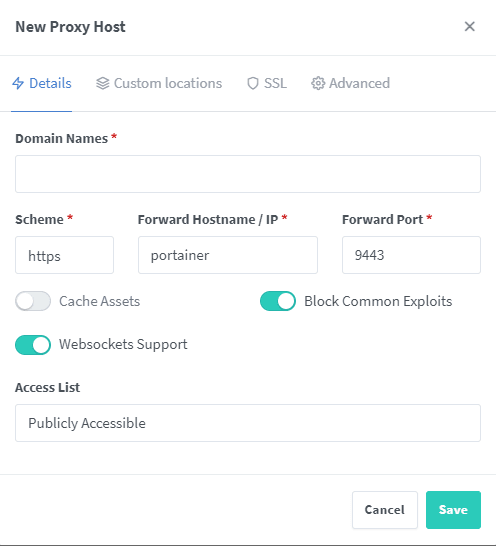
Point this for the container name running Portainer. If you follow my compose file the name is portainer, so the hostname will be portainer. This is why we need to create a global docker network as Nginx needs to communicate with the app container.
After saving both of the host, we can access our dashboard by the domain we configure. and from now on, no longer need to use the Server IP’s to go to the dashboard.
7. Deploying Application
To deploy our application, we need to add it to our manifest repository.
.
├── renovate.json
├── nginx
│   └── docker-compose.yml
├── portainer
│  └── docker-compose.yml
└── your application
    └── docker-compose.yml
Don’t forget to add the Network config on our compose file of the application!
networks:
  default:
    name: my_network
    external: true
Then we need to add that application on the Portainer dahsboard. Go to environment -> stacks -> add stacks
Fill the name of our stack then choose ‘Repository’ for the build method. Enter all of the information needed and don’t forget to turn on the GitOps updates. With this setting, Portainer will send a polling to check updates of the compose file. We don't need to setup manually again, Portainer will automate all the deploying process.
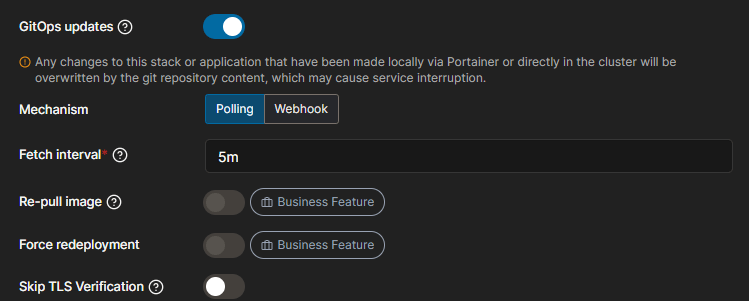
Deploy the stack when all done.
8. Seting up Domain for the application
After our container boots up on Portainer, all we need is assigning a domain for our application. Refer to step 5 first to add it on the DNS records. Then we need to configure the proxy host on Nginx Proxy Manager.
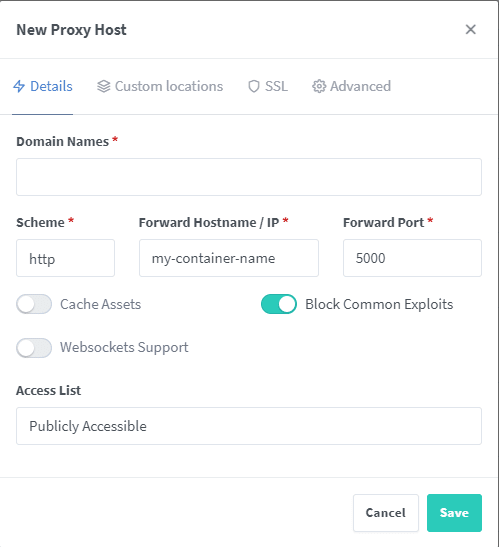
That’s all, it was a bit complicated at first but it is worth the time when there is a version update. All we need is merge the version bump from Renovate Bot and Portainer will spin it up automatically.
Notable Notes
Exposed Ports
With the docker network we setup earlier, we no longer need to expose a port on each container. All communication cross-container are handled by the docker Network as long as the container are connected to the same docker network.
We can safely remove the port config on Portainer and Nginx Proxy Manager except the 80:80 and 443:443 as it now become the gateway for all application we have to the public internet.
Wrap Up
In this article, we have learned how to streamline an application delivery using docker compose, Portainer and Nginx Proxy Manager.
It’s not a one-size-fits-all solution but rather a practice that can be adapted to our specific needs. Not as powerful as Kubernetes, but this software delivery pipeline are more than enough for small to middle scale application.
That’s it for this article. Thank you for reading!
Member discussion